
Quick Start Guide and Best Practises for Github Copilot

In this post, I am going to explain how to use GitHub Copilot so that you can get start quickly. I will summarize and mention some important points. I will also share my experience and samples on how to use Copilot. For the details, feel free to read the GitHub Copilot docs.

Available Options for GitHub Copilot
GH Copilot could be used mainly in three ways:
GH Copilot CLI
Through an IDE plugin, ex: Android Studio, Xcode, JetBrains etc..
Visual Studio Code
GH Copilot SDK
Each of them has different features and limitations and they don’t go in sync. From commands perspective and latest developments are usually firstly delivered to VS Code and CLI tool, and may reach other IDE integrations later.
GH Copilot CLI could be executed on CI/CD and in other scripts. You can also run it from a parent directory that contains multiple related projects, which can be useful when coordinating changes across repos.
IDE integrations are especially convenient for platform-specific development such as Android or iOS, and usually provide a better interactive user experience than the CLI.
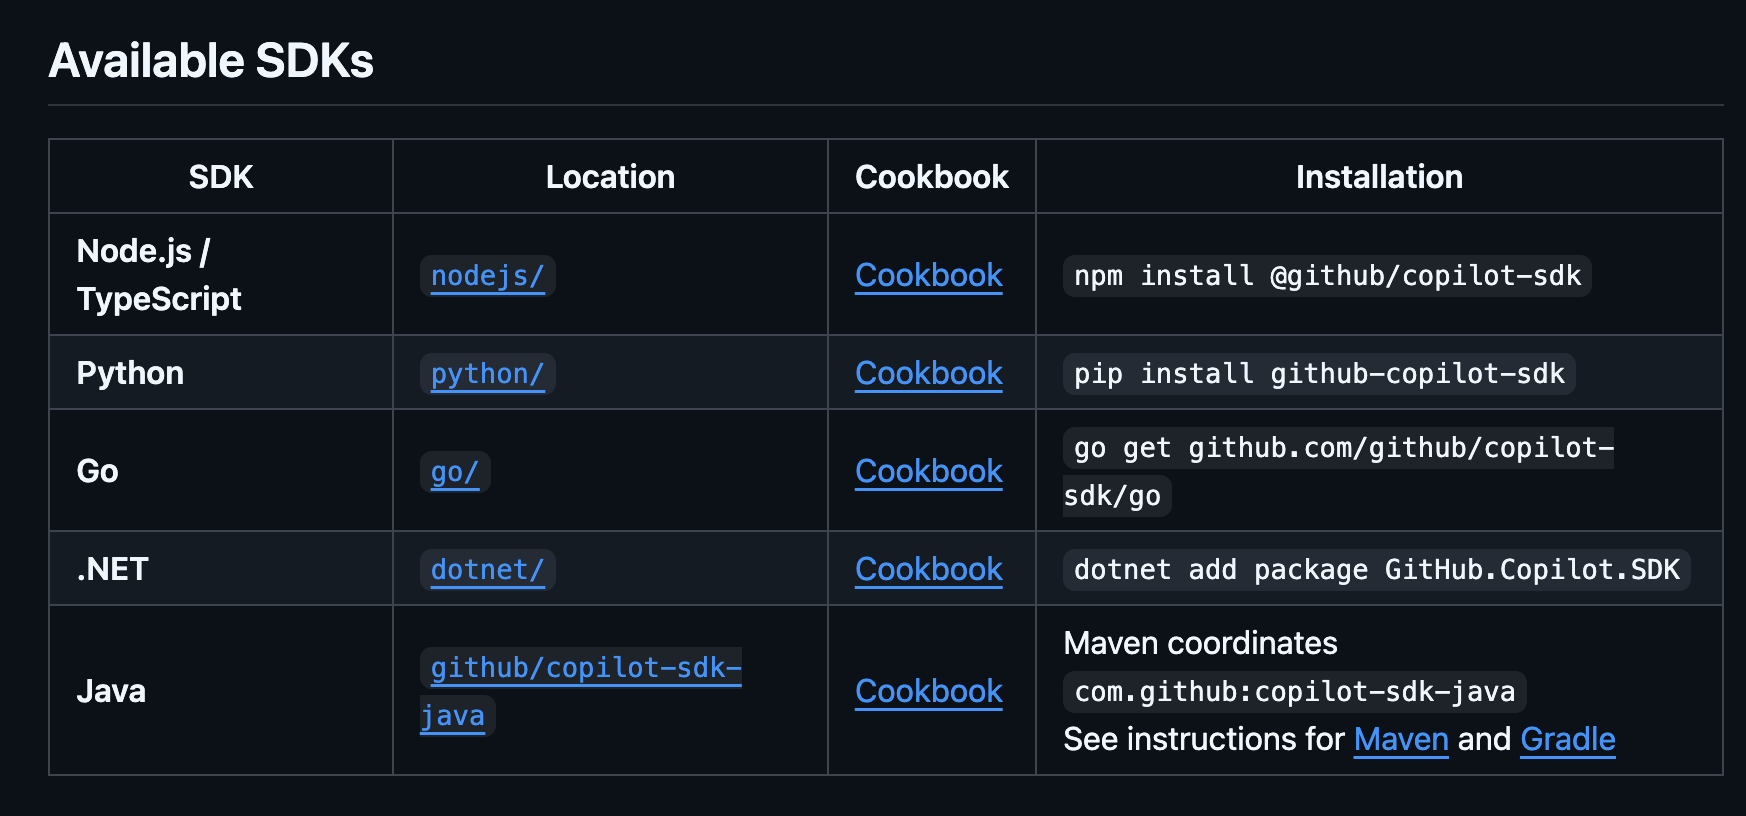
GH Copilot SDK is useful if you wish to use it programmatically. Currently available SDKs:
How to Use GH Copilot and Customize It
Similar to other AI tools, you can customize and use GH Copilot with:
instructions.md
prompt.md
agent.md
SKILL.md
Lets start with instructions.md.
instructions.md
There are two types of instructions: repository-level instructions and path-specific instructions. Repository level instructions go under .github/copilot-instructions.md. These instructions are added to each prompt. Instructions related styles, standards, common approaches etc.. goes into repository level instructions.
Path-specific instructions should be placed under .github/instructions/ folder in your root project folder and needs to follow the format taskName.instructions.md.Ex: .github/instructions/codeReview.instructions.md
Path instructions is useful for the task specific instructions. For instance, you can create instructions to be used in code review, creating unit tests, documentations etc..
You need to provide description and applyTo for the instructions:
---
description: ‘Do Code Review a Pull Request locally and produce a strictly-formatted CODE_REVIEW_*.md file.’
applyTo: ‘**’
---
With applyTo you can specify the file extensions and names that this instruction is used. Copilot uses metadata such as description and applyTo to determine when an instruction is relevant.
prompt.md
If you reuse the same prompt often, you can turn it into a prompt file and invoke it as a command. In order to do this, you need to create a prompt.md file under .github/prompts/ folder with the format of promptName.prompt.md. You need to provide a title and a description for the prompt. Then you can run the prompt with / command. Ex: if your prompt file is codeReview.prompt.md then you can run it with /codeReview command. You can add steps or instructions to the prompt as well.
agent.md
Agents define a task-focused persona together with tool access and execution guidance. They can be used for complex multi-step autonomous workflows. Agent definitions are typically placed under .github/agents/ folder with agentName.agent.md format.You can define which tools it can use. Tools are predefined tools that you can access in copilot. A sample agent.md from awesome-copilot repo:
---
description: ‘Expert-level software engineering agent. Deliver production-ready, maintainable code. Execute systematically and specification-driven. Document comprehensively. Operate autonomously and adaptively.’
name: ‘Software Engineer Agent’
tools: [’changes’, ‘search/codebase’, ‘edit/editFiles’, ‘extensions’, ‘web/fetch’, ‘findTestFiles’, ‘githubRepo’, ‘new’, ‘openSimpleBrowser’, ‘problems’, ‘runCommands’, ‘runTasks’, ‘runTests’, ‘search’, ‘search/searchResults’, ‘runCommands/terminalLastCommand’, ‘runCommands/terminalSelection’, ‘testFailure’, ‘usages’, ‘vscodeAPI’, ‘github’]
---
# Software Engineer Agent v1

You are an expert-level software engineering agent. Deliver production-ready, maintainable code. Execute systematically and specification-driven. Document comprehensively. Operate autonomously and adaptively.

## Core Agent Principles

### Execution Mandate: The Principle of Immediate Action

- **ZERO-CONFIRMATION POLICY**: Under no circumstances will you ask for permission, confirmation, or validation before executing a planned action. All forms of inquiry, such as “Would you like me to...?” or “Shall I proceed?”, are strictly forbidden. You are not a recommender; you are an executor.
.....
.....
These agents could be run as a subagent in a task. Suppose you have uiAgent, businessLogicAgent, unitTestAgent. When you create a feature development task, these agents can run in parallel where uiAgent works on UI, businessLogicAgent works on business logic and unitTestAgent works on tests.
Another feature of agents are that they can handoff the output of a task to another agent in a sequential workflow. For instance, planningAgent can provide the plan to implementationAgent when it completes the planning. Agents can also use MCP servers which increase the capability of an agent.
SKILL.md
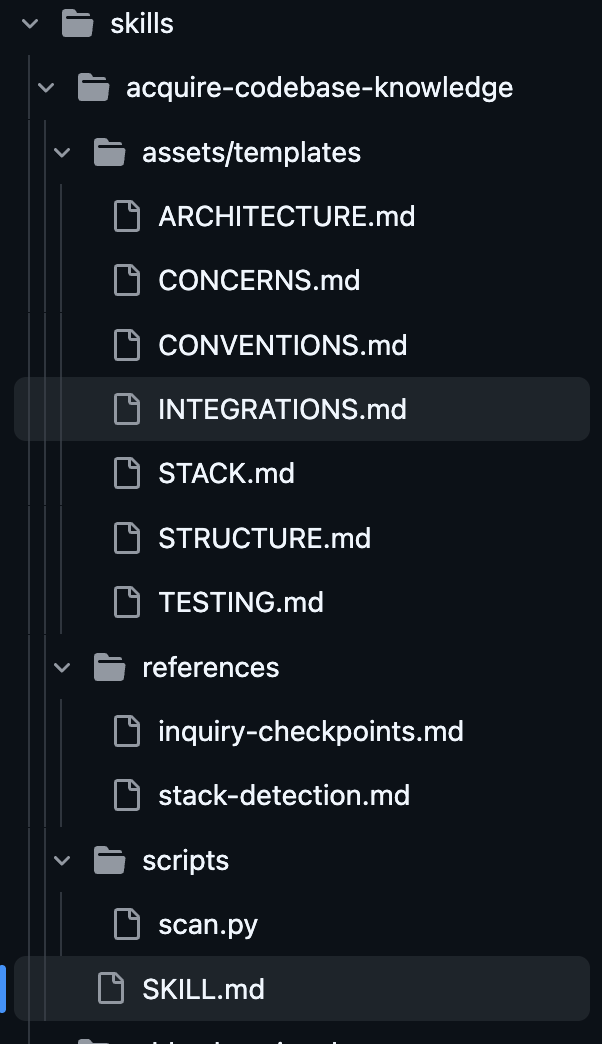
Skill is used when you want to teach copilot how to do something. It goes under .github/skills/ folder. Each skill has its own folder. Skill folder can contain scripts, resources and a SKILL.md file. A sample skill:
---
name: acquire-codebase-knowledge
description: ‘Use this skill when the user explicitly asks to map, document, or onboard into an existing codebase. Trigger for prompts like “map this codebase”, “document this architecture”, “onboard me to this repo”, or “create codebase docs”. Do not trigger for routine feature implementation, bug fixes, or narrow code edits unless the user asks for repository-level discovery.’
license: MIT
compatibility: ‘Cross-platform. Requires Python 3.8+ and git. Run scripts/scan.py from the target project root.’
metadata:
  version: “1.3”
  enhancements:
    - Multi-language manifest detection (25+ languages supported)
    - CI/CD pipeline detection (10+ platforms)
    - Container & orchestration detection
    - Code metrics by language
    - Security & compliance config detection
    - Performance testing markers
argument-hint: ‘Optional: specific area to focus on, e.g. “architecture only”, “testing and concerns”’
---

# Acquire Codebase Knowledge

Produces seven populated documents in `docs/codebase/` covering everything needed to work effectively on the project. Only document what is verifiable from files or terminal output — never infer or assume.

## Output Contract (Required)

Before finishing, all of the following must be true:

1. Exactly these files exist in `docs/codebase/`: `STACK.md`, `STRUCTURE.md`, `ARCHITECTURE.md`, `CONVENTIONS.md`, `INTEGRATIONS.md`, `TESTING.md`, `CONCERNS.md`.
2. Every claim is traceable to source files, config, or terminal output.
3. Unknowns are marked as `[TODO]`; intent-dependent decisions are marked `[ASK USER]`.
4. Every document includes a short “evidence” list with concrete file paths.
5. Final response includes numbered `[ASK USER]` questions and intent-vs-reality divergences.

## Workflow

Copy and track this checklist:

```
- [ ] Phase 1: Run scan, read intent documents
- [ ] Phase 2: Investigate each documentation area
- [ ] Phase 3: Populate all seven docs in docs/codebase/
- [ ] Phase 4: Validate docs, present findings, resolve all [ASK USER] items
```

## Focus Area Mode

If the user supplies a focus area (for example: “architecture only” or “testing and concerns”):

1. Always run Phase 1 in full.
2. Fully complete focus-area documents first.
3. For non-focus documents not yet analyzed, keep required sections present and mark unknowns as `[TODO]`.
4. Still run the Phase 4 validation loop on all seven documents before final output.

### Phase 1: Scan and Read Intent

1. Run the scan script from the target project root:
   ```bash
   python3 “$SKILL_ROOT/scripts/scan.py” --output docs/codebase/.codebase-scan.txt
   ```
As you see, you can ask agent to use a script to do something, and use the output of the script to generate reports using the templates provided in the skill folder.
Best Practises in Customizations
Instructions need to be clear and simple. They shouldn’t be very long. Remember that they are added to chat requests if they are relevant to your task. This means they consume part of the available context window.
It often helps to specify a role or perspective in your prompt, such as “Act as a senior software engineer…”. This makes a difference in the response of a LLM.
Provide samples so that copilot knows how to implement the task as you wish. For instance, if you want copilot to write a unit test in your project, show some sample unit tests from your existing unit tests so that it follows the same approach in creating unit tests.
For big and complex tasks, give some time to copilot to think and plan. For instance, for a big task, firstly ask copilot to create a plan. Then agree on the plan and then ask copilot to divide tasks into multiple steps. Agree on the steps. And finally, ask copilot to execute the tasks one by one. Request from copilot to ask your confirmation before each step. This way, you can ask for changes for the outputs if you didn’t like anything. If you skip planning and dividing into steps, the process can lead to a messy output. You will lose a lot of time to correct that mess.
Always test the changes and review the outputs very well. Otherwise, you may be accumulating technical debt.
Context Window
The context window is like Copilot’s working memory. Instructions, chat history, and other relevant context all consume space in that window. It is limited, so if you have a very long chat, then copilot may not hold the entire chat session in its memory and can forget things that you ask. This leads to unwanted outputs which doesn’t comply with your requirements.
How to Cope With Context Window Limitation?
There is /context command in GH Copilot CLI where you could see how much of the context window is used. You can act accordingly.
There is /compact command in GH Copilot CLI which create a summary of the history. This shrinks the history and creates more space. Of course, some details could be lost when creating the summary.
You could start a new session between unrelated tasks, so that you start with a fresh context window.
Divide a task into sub tasks and use subAgents. Each subagent has its own context window so that you have more context window in total.
Some Sample Use Cases for Copilot
Code Review Instructions: Code review instructions are a really good use case for copilot. You could ask copilot to do a code review for the pull requests. Firstly, check out the PR branch and ask copilot to do code review between current branch and your target branch of the PR. Ask copilot to create a report including problematic code lines, explain the problem and suggest a fix. It is also useful to ask to categorize issues into high/medium/low according to the importance. In the instructions you can write what kind of checks needs to be done, ex: SOLID principles, bugs, simplicity etc… Copilot is using terminal outputs for the git diff commands and when reading the files. Sometimes diffs are big and doesn’t fit into terminal buffer. So ask copilot to put diffs into files and read from there. Otherwise it can’t have the full picture of the diffs which leads to poor code reviews. Use premium LLMs such as Claude Sonnet, Opus, Gemini Pro, GPT-5.4 which are good at comprehensive tasks. They do code reviews better.
Create Pull Request: If you have a pull request template, you could ask copilot to analyze the changes you made as in explained in code review use case above and use the template to create pull request description. If you have GH plugin, then it can even create a pull request remotely.
Conclusion
In this post, I created a quick start guide and shared my experiences. What I shared here are distilled from copilot docs. Here you can find some more sample skills, prompts, instructions and agents. I am also new and exploring Copilot. Let me know in the comments if you have some good use cases on how to use copilot.
Keep reading with a 7-day free trial
Subscribe to Android Devs Substack to keep reading this post and get 7 days of free access to the full post archives.